Node-RED to create complex data workflows #
Node-RED “is a programming tool for wiring together hardware devices, APIs and online services in new and interesting ways. It provides a browser-based editor that makes it easy to wire together flows using the wide range of nodes in the palette that can be deployed to its runtime in a single-click. Node-RED is a flow-based programming tool, originally developed by IBM’s Emerging Technology Services team and now a part of the JS Foundation”.
It is built on Node.js and is available on a large
variety of platforms. You can use Node-RED on a Raspberry PI, a desktop computer or your laptop. If it is not already installed on your computer, you can follows
instructions from the Node-RED web site. See this video illustrating Node-RED’s main features.
You need first to start Node-RED locally with:
> node-red
or
> node-red-start
Then, you can use a web browser to connect to the local Node-RED web interface on http://127.0.0.1:1880.
Assignment 1: write a simple Node-RED flow with MQTT nodes #
Create a Node-RED flow with:
- an MQTT input node listening for data on
UPPA/Duboue/S25/temptopic fromtest.mosquitto.orgMQTT broker - a Function node that would decrease the received temperature by 1.8 degree Celcius
- an MQTT output node that will publish the new temperature on
UPPA/Duboue/S25/realtemptopic ontest.mosquitto.orgMQTT broker
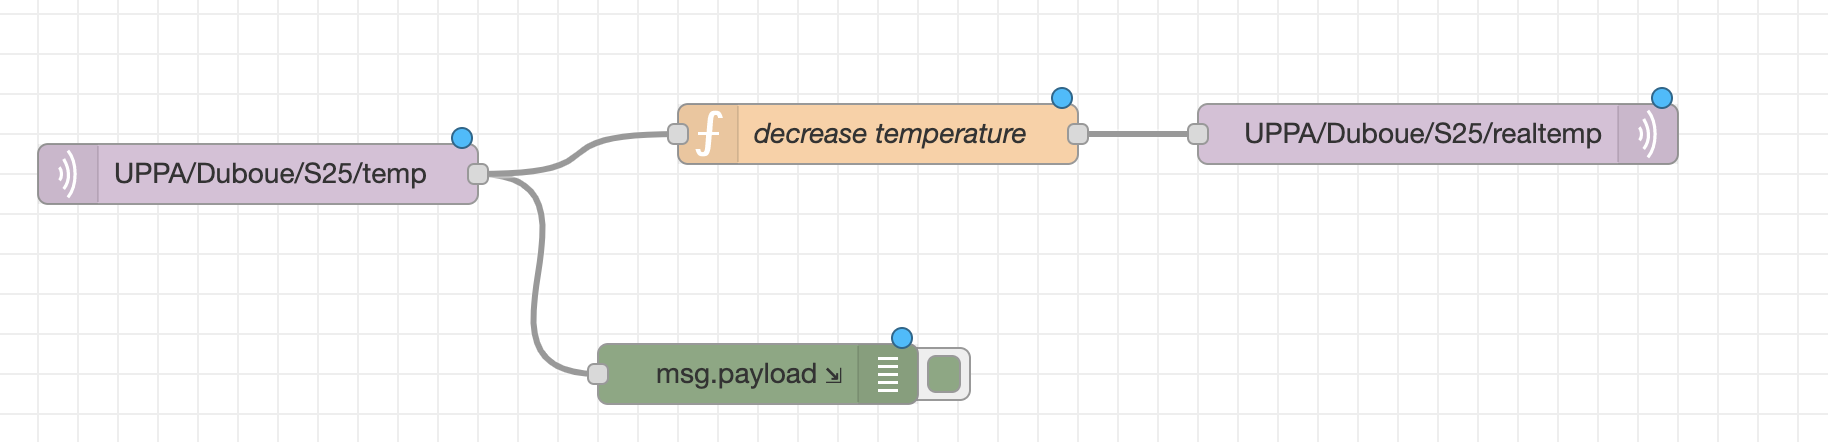
In the Function node, you can add simple Javascript code to process msg.payload which will normally contain the received temperature (string format) on UPPA/Duboue/S25/temp. You can also add a debug node after the MQTT input node to verify that you can correctly receive on UPPA/Duboue/S25/temp. You can then test your Node-RED flow by deploying it (Deploy button) and use mosquitto_pub and mosquitto_sub commands to respectively publish on UPPA/Duboue/S25/temp and receive on UPPA/Duboue/S25/#.
The commands would then look like:
mosquitto_pub -h test.mosquitto.org -t UPPA/Duboue/S25/temp -m "21.6", to publish a temperature of 21.6 degree Celsiusmosquitto_sub -v -h test.mosquitto.org -t UPPA/Duboue/S25/#, to subscribe to all topics underUPPA/Duboue/S25
Use a terminal to subscribe. Then use another terminal to publish. Normally, each time you publish “21.6” on UPPA/Duboue/S25/temp, you should receive a modified temperature on UPPA/Duboue/S25/realtemp, if your Node-RED flow is correctly developed.
> mosquitto_sub -v -h test.mosquitto.org -t UPPA/Duboue/S25/#
UPPA/Duboue/S25/realtemp 19.8
UPPA/Duboue/S25/realtemp 19.8
UPPA/Duboue/S25/realtemp 19.8
...
Assignment 2: add a ThingSpeak node to upload on ThingSpeak cloud #
In a second step, you will add a ThingSpeak node to publish the modified temperature on a ThingSpeak channel. To do so, you may need to install the ThingSpeak node with:
> cd
> cd .node-red/node_modules
> npm install node-red-contrib-thingspeak42

You can then use our ThingSpeak LoRa test channel (
https://thingspeak.com/channels/66794, the write key is SGSH52UGPVAUYG3S) and assign the modified temperature to the field of your choice (field 1 to field 8). The Node-RED ThingSpeak node works as follows: for each field, you need to indicate a matching topic that will trigger the upload on that field. So, somewhere in the Function node, you need to assign msg.topic to the topic you chose for that field. In this example, you can just take msg.topic= UPPA/Duboue/S25/realtemp. If your Node-RED flow is correct, you should also see the temperature value you published on UPPA/Duboue/S25/realtemp uploaded on the ThingSpeak channel as well. Use https://api.thingspeak.com or https://thingspeak.com for the API URL of the Node-RED ThingSpeak node. Check on the
channel page for the data you are uploading. **If you are behind a proxy, the ThingSpeak block may not work **.
Assignment 3: emulating a real-world IoT deployment scenario #
Here, we are going to emulate a more realistic scenario where an IoT gateway will run the Node-RED flow and will receive data from sensor nodes through an adhoc wireless communication using long-range radios such as LoRa for instance. In that case, the Node-RED flow will not listen on an MQTT topic but rather will receive and process data from sensor nodes.
To add an additional data sub-flow in the current flow, simply add new processing nodes to the current Node-RED flow and chain them accordingly. All Node-RED data sub-flows are executed in parallel.
Here, you will use an Inject node to inject the string “Sensor6/temp/21.6” to the Node-RED flow. That would emulate reception of data from a physical sensor node. From a Node-RED perspective, msg.payload will be set to Sensor6/temp/21.6. This string will then be injected into a Change node. At this point, to better understand how Node-RED messages work and their format you may have a look at
Steves Node-Red Guide on “Understanding and Using The Node-Red Message Object” and
Node-RED documentation on “Working with messages”.
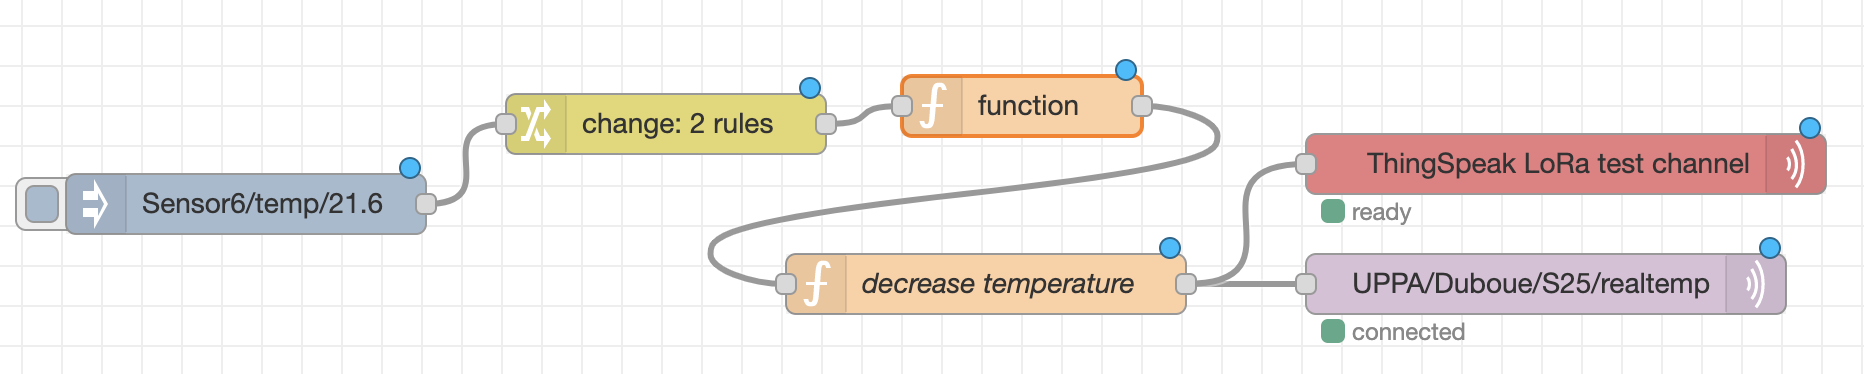
Configure the Change node to translate “Sensor6” into “UPPA/Duboue/S25” and “temp” into “realtemp”. Then add a new Function node to process (split) UPPA/Duboue/S25/realtemp/21.6 in order to have msg.topic set to UPPA/Duboue/S25/realtemp and msg.payload changed to 21.6. You can use Javascript msg.payload.lastIndexOf(), msg.payload.substring() and msg.payload.length to write your processing code. Remember that you can add debug nodes to verify at each step of your Node-RED flow that it performs as expected.
The message that will come out from the new Function node will then be injected to a copy of your previous Function node that would decrease the received temperature by 1.8 degree Celcius. The final MQTT output node that publishes on UPPA/Duboue/S25/realtemp will now simply need to use msg.topic as the MQTT topic and msg.payload as the new temperature value to publish. Therefore leave the MQTT Topic field empty in the MQTT node configuration tab.
As in Assignment 1, use a terminal to subscribe to UPPA/Duboue/S25/#. Normally, each time you inject the string “Sensor6/temp/21.6” in your Node-RED flow, you should receive a modified temperature on UPPA/Duboue/S25/realtemp, if your Node-RED flow is correctly developed.
> mosquitto_sub -v -h test.mosquitto.org -t UPPA/Duboue/S25/#
UPPA/Duboue/S25/realtemp 19.8
UPPA/Duboue/S25/realtemp 19.8
UPPA/Duboue/S25/realtemp 19.8
...
Assignment 4: even more realistic #
Replace the Inject node by a Tail node that would continuously look for new lines in a local nodered.txt file which content will look as follows.
Sensor6/temp/21.6
Sensor6/temp/21.3
Sensor6/temp/21.2
Sensor6/temp/21.5
...

To do so, you may need to install the Tail node with:
> cd
> cd .node-red/node_modules
> npm install node-red-node-tail
Then, from a Terminal window, simply add new lines in nodered.txt with:
> echo "Sensor6/temp/21.6" >> nodered.txt
As in Assignment 1, use a terminal to subscribe to UPPA/Duboue/S25/#. Normally, each time you add a line “Sensor6/temp/21.6” in nodered.txt, you should receive a modified temperature on UPPA/Duboue/S25/realtemp, if your Node-RED flow is correctly developed.
In a real scenario, the IoT gateway could generate new lines in nodered.txt when it receives new data from remote sensor nodes. So with this last example, you reproduced the typical behavior of a Node-RED flow that could be run on an IoT gateway.
Add additional Node-RED processing nodes #
Play with Node-RED, search the web and add additional processing nodes such as email or social media nodes. For email, install the Node-RED node as follows:
> cd
> cd .node-red/node_modules
> npm install node-red-node-email
Assignment 5: create fancy dashboards #
Use node-red-dashboard module to further create fancy dashboards for IoT applications. You can follow
these instructions from the Node-RED web site.
Unleash your imagination and be creative!
Enjoy!
2021 - Congduc Pham