A DIY low-cost LoRa gateway
C. Pham, LIUPPA laboratory, University of Pau, France. http://web.univ-pau.fr/~cpham
last update: Nov. 30th, 2018.
Follow this link and this link for building
end-devices
Get gateway the step-by-step tutorial and the leaflet
describing how to build the low-cost LoRa gateway. Have a look
at the antenna tutorial as well to see how to optimally deploy your
gateway.
Have a look at the
Low-cost
LoRa gateway YouTube tutorial video to see all the steps
in image.
1. Introduction
This page describes our low-cost LoRa gateway based on a Raspberry PI. The gateway can receive from any LoRa device and is designed to be fully customizable for a targeted application with post-processing features based on high-level languages such as Python. Typical post-processing features are to push the received data on various IoT/cloud platforms. We provide many example templates for FirebaseTM, ThingSpeakTM, SensorCloudTM, GroveStreamsTM, FIWARE,...
There are many advanced and well-integrated LoRa gateways capable of simultaneous reception on several channels and implementing the LoRaWAN specification. These gateways are based on the SX1301 baseband concentrator. Our LoRa gateway could be qualified as "single channel" as it uses the SX1272/76, much like an end-device would do. However, in order to increase LoRa transmission robutsness we improve the LoRa transmission with CSMA features (or so-called Listen Before Talk) and add Quality of Service guarantees with regards to radio time limitations. This solution keeps the cost of the gateway low and can satisfy small to medium size deployment scenario for ad-hoc application cases in various private usages, farming, agriculture, infrastructure surveillance, application-specific telemetry systems,... Note that more than 1 gateway can be deployed to serve several channel settings. However, it is probably not adapted, in the current state of development, to large-scale deployment with a large number of end customers from various different organizations with their own and different requirements regarding data management, confidentiality and security.
WAZIUP platform
The work presented here is part of the EU H2020 WAZIUP (grant agreement number 687607, 2016-2019) and EU H2020 WAZHUB (grant agreement number 780229, 2018-2021) projects which objective is to develop low-cost IoT solutions for deployment in sub-saharian African countries.
GitHub repository
Go to our GitHub repository which keeps the latest version the low-cost gateway software. There are a lot of information on the GitHub pages and these pages will be the ones with the most up-to-date information. Here, we will more focus in describing the underlaying software architecture and details of the low-cost gateway.
DOWNLOAD: full SD card zipped image for the Raspberry gateway – based on Raspbian Jessie
- Supports Raspberry 1B+, RPI2, RPI3B/3B+, RPI0 and RPI0W.
- Get the zipped image, unzip it, install it on an 8GB SD card, see this tutorial from www.raspberrypi.org
- Plug the SD card into your Raspberry
- Connect a radio module (see below)
- Power-on the Raspberry
- The LoRa gateway starts automatically when RPI is powered on
- With an RPI3B/3B+ and RPI0W, the Raspberry will automatically act as a WiFi access point. For RPI 1&2, see instructions on github
- Update to the latest gateway version: https://github.com/CongducPham/LowCostLoRaGw#installing-the-latest-gateway-version
- By default, incoming data are uploaded to our LoRa ThingSpeak test channel
- Works out-of-the-box with the Arduino_LoRa_Simple_temp sketch
2. Hardware components
The gateway is based on a Raspberry PI. RPI 1B+/2B/3B/3B+/Zero can be
used. Most of SPI-based LoRa modules are supported. We tested with (a) Libelium LoRa radio
module, (b) HopeRF RFM92W/HopeRF RFM95W (or RFM96W for 433MHz),
(c) Modtronix inAir9/inAir9B (or inAir4 for 433MHz), (d) NiceRF
LoRa1276. Libelium LoRa and RFM92W use the Semtech SX1272 chip
while RFM95W, inAir9/9B and NiceRF LoRa1276 use the SX1276 which
is actually more versatile.
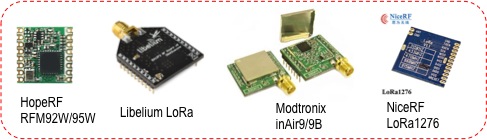
Figure: supported (tested) radio modules
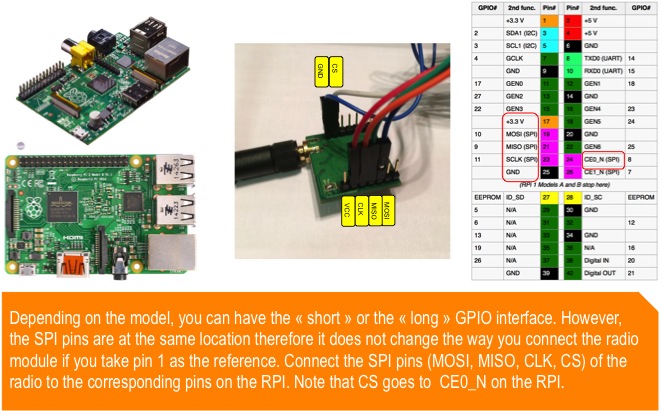
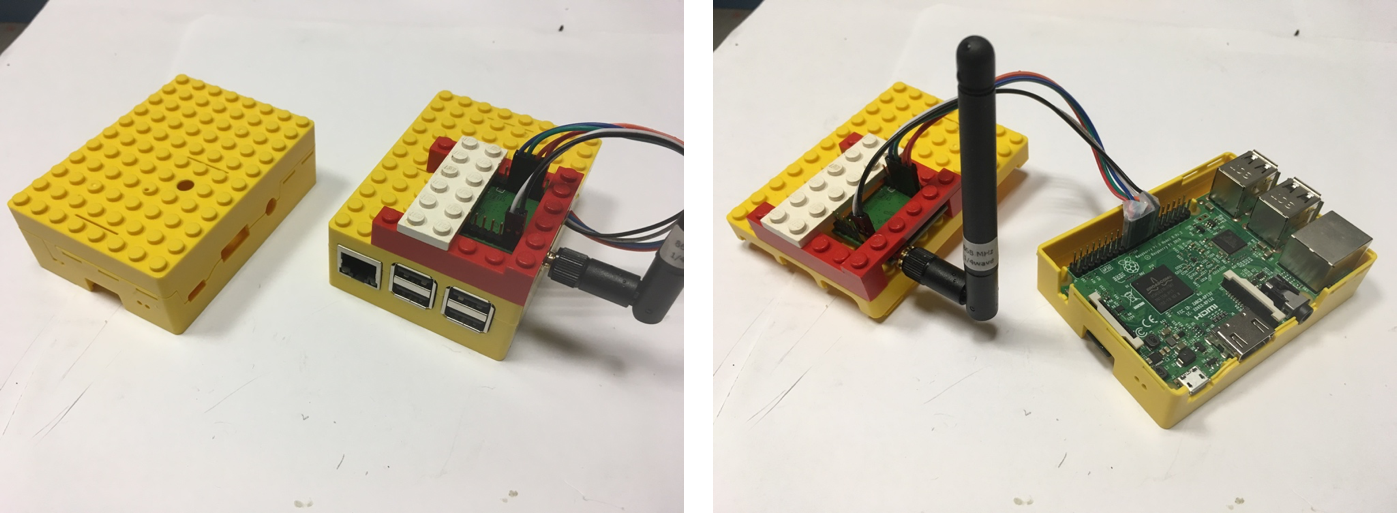
Figure: Left: Hardware components with a Modtronix inAir9 radio module. Right: RPI GPIO header for RPI 1B (short) and RPI 2B/3B (long)
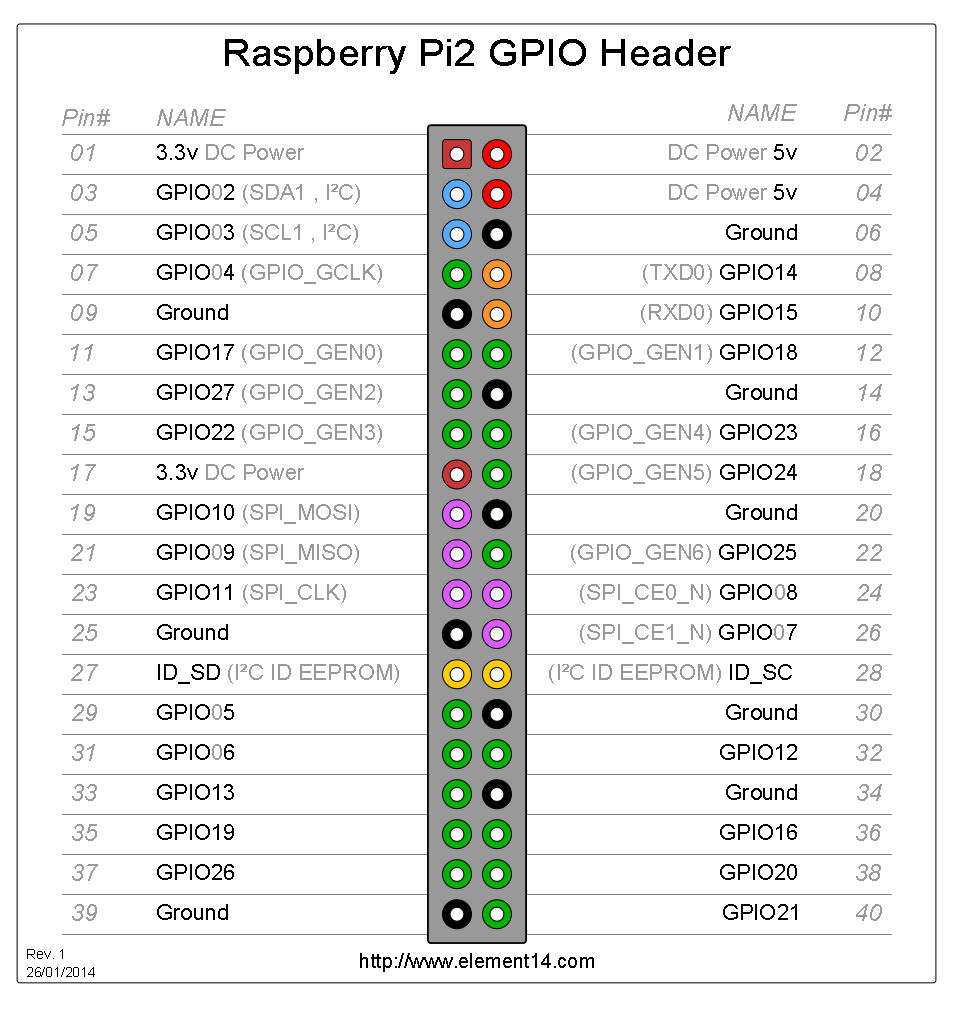
Figure:GPIO header of the RPI
The RFM95W with the adapter can be very low-cost (around 5€) which makes it quite attractive for our low-cost LoRa gateway. The HopeRF RFM95W module is shown below. An adapter/breakout is needed to have the breakout pins (the RFM95W module is quite small) and most importantly, to connect an antenna connector such as an SMA connector.
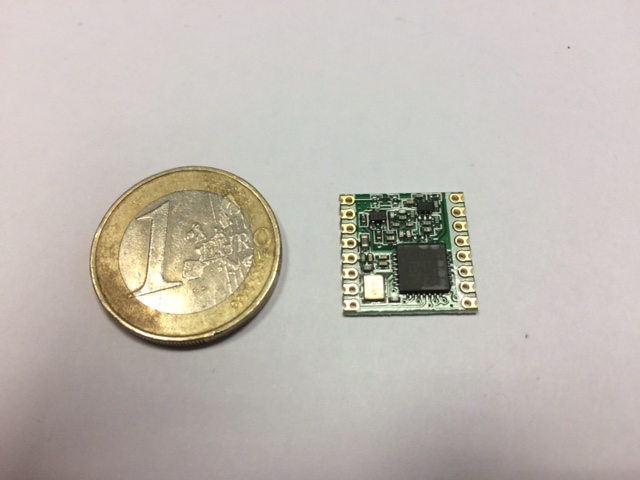
Simple RFM95W PCB breakout
We developed simple PCBs for Arduino ProMini, Arduino Nano and RaspberryPI and made the Gerber files freely available. You can have all information for these PCBs on our GitHub PCB section.
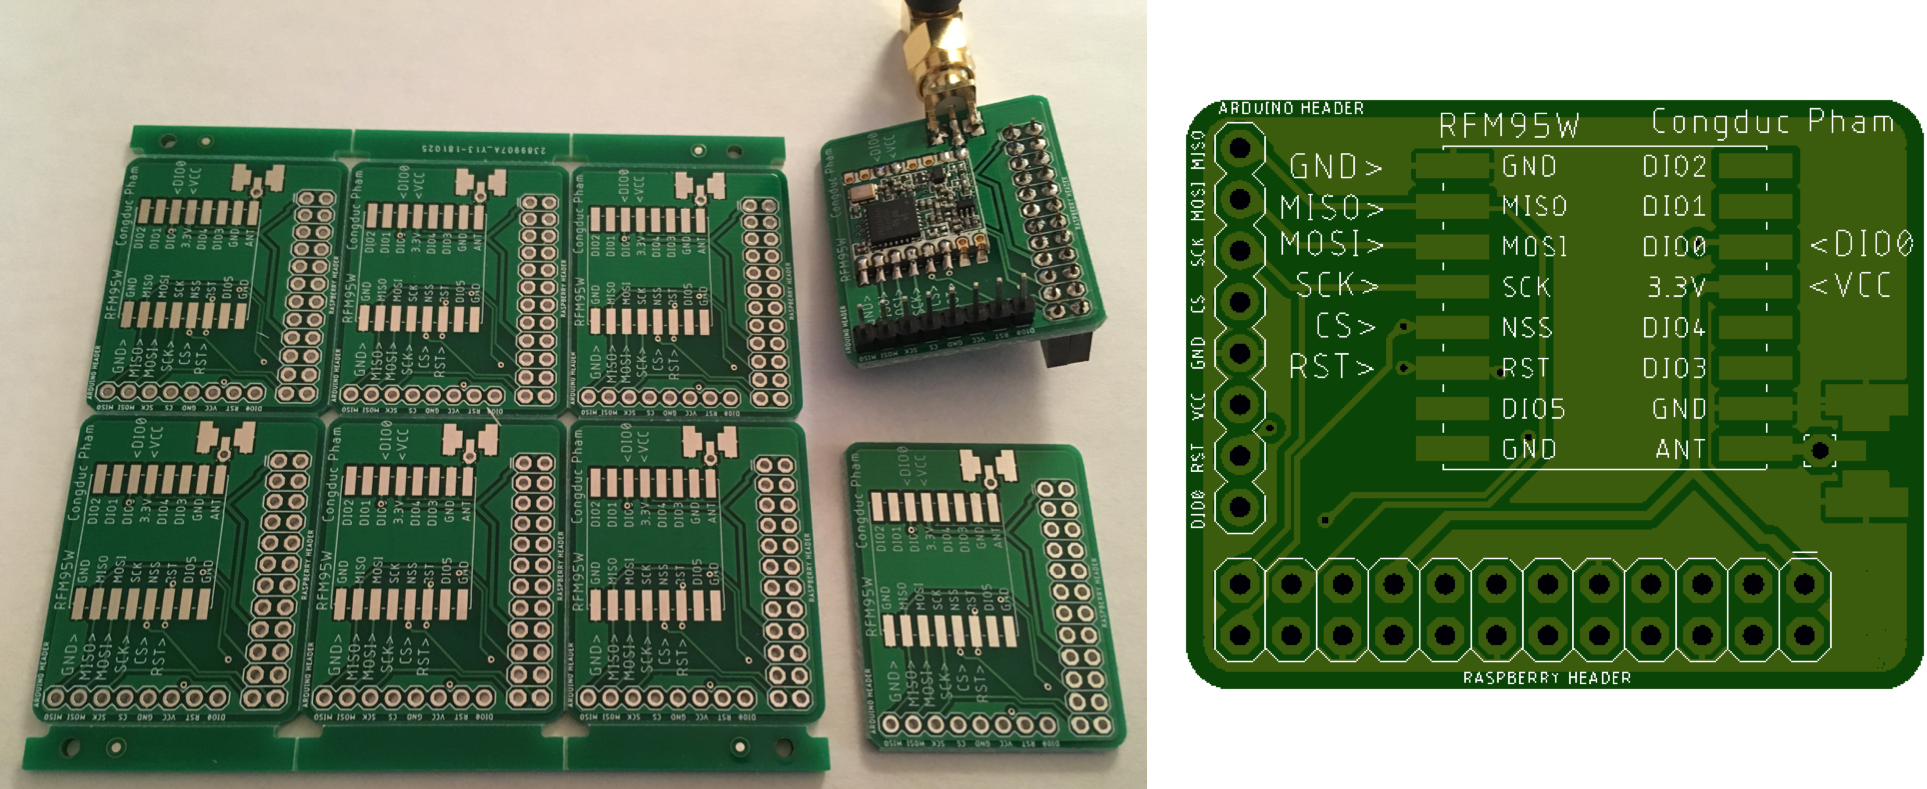
There are now many RFM95W breakout available, for instance from Adafruit with the RFM95W already provided. But there are also low-cost breakout PCB alone such as those proposed by Charles Hallard on his github. This link show a dedicated RFM95W breakout PCB (the LoRasPI breakout) for the Raspberry that you can make it built by PCBs.io. This version can also be used for the gateway although it is more designed for an end-device. There is also this nice breakout from ccadic's github and this one from Tindie.
3. Main architecture
Initially, the gateway was implemented on an Arduino (MEGA/Due) for test purpose and for having a "direct" transparent radio bridge. We enhanced the gateway code but maintained compatibility with Arduino therefore the main features are available on both platforms which can be very convenient when deploying Arduino-based very light-weight gateways. On the RPI, we use the arduPI layer provided by Libelium to run both the SX1272 library and the gateway program. The original SX1272 library has been significantly improved to support also the SX1276, to add CSMA-like capability to increase LoRa efficiency and implement the possibility to dynamically ask for an ACK from the receiver side as well as handle downlink messages.
Note that the original Libelium library drives the LoRa module does not use DIO pins as many other libraries do, so there is no need to connect these pins. You can use other development codes using DIO pins by connecting the required pins that are mostly configured as follows DIO0 (RXdone or TX done), DIO1 (RX timeout) and DIO5 (ready). Of course, you have to check first. Some may also use the RST pin to reset the module.
The original library adds 5 bytes for internal usage as shown is the following figure, taken from the Libelium documentation.
| dst addr (1 byte) |
src addr (1 byte) |
sequence number (1 byte) |
payload length (1 bytes) |
payload data (variable
length) |
retry counter (1 byte) |
The dst addr allows the library to filter packet at the
receiver by comparing with the end-device addr that should be
set at startup. Therefore, the current maximum number of nodes
is 254 (1 is usually used for the gateway and 0 is usually used
to indicate broadcast).
Our SX1272/76 modified library uses a modified header where
both the packet length and retry field are removed (packet
length will be determined at receiver side). A packet type field
has been added to ease the decoding process.
| dst addr (1 byte) |
packet type (1 byte) |
src addr (1 byte) |
sequence number (1 byte) |
payload data (variable
length) |
The library is simple enough for you to modify it according to
your need: more address space, longer sequence number,
network/app/device key,...
The packet type structure is as follows: Ptype = 1 (B0001) for a DATA packet and Ptype = 2 (B0010) for an ACK packet:
| Ptype (4 bits) |
ack_requested flag (1 bit) |
data_encrypted flag (1 bit) |
with_appkey flag (1 bit) |
is_downlink flag (1 bit) |
The Libelium SX1272 library defines 10 so-called LoRa mode that
use various combinations of LoRa parameters: bandwidth,
spreading factor, coding rate. Figure below shows these
combinations and the time on air associated to them. The payload
value includes the 5-bytes header.
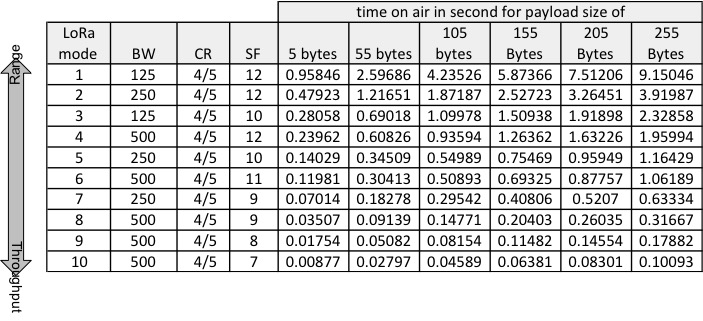
Figure: Defined Libelium LoRa mode and their time on air
The philosophy of our proposed gateway is to keep the low-level radio gateway code very simple while having advanced post-processing features implemented by end-user with high-level languages such as Python. We provide a post_processing_gw.py script with several cloud features to demonstrate our approach and to serve as a starting point for your own development needs.
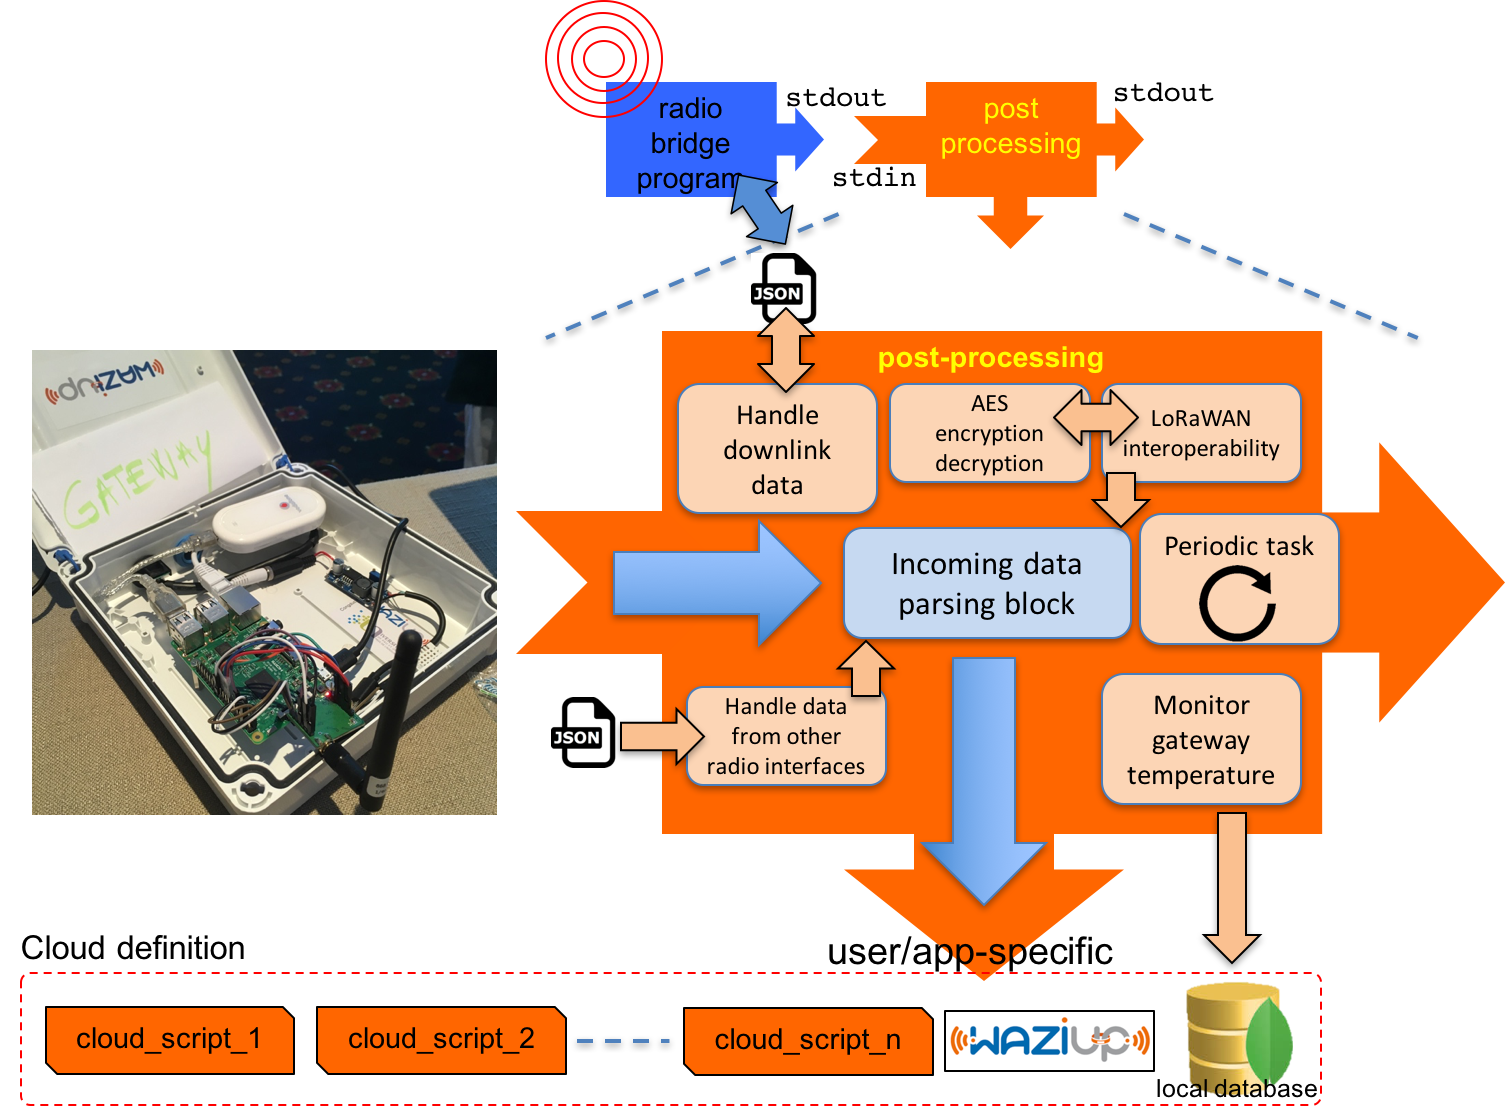
Figure: Main architecture of the gateway and post-processing
feature
Basically, the low-level gateway redirects on UNIX stdout everything that it
receives from the end-devices. When receving a packet, the
source address, the sequence number, the payload length, the SNR
and the RSSI are also provided to the higher level.
4. Simple gateway
After compiling the lora_gateway program which is the low-lvel gateway program, the most simple way
to start the gateway is in standalone mode as shown below. The
default gateway configuration is to use Libelium LoRa mode 4
(865.2MHz with BW=500kHz, SF=12, CR=4/5) at maximum transmission
power (not +20dBm). The preamble length is 8 and the address is
1.
Figure: Gateway running in standalone mode
In the example above, let's assume that sensor 10 sends "T=23°". Then the low-level gateway will output:
^p1,16,10,0,5,5,-54
^r500,5,12
^t2016-02-17T19:56:17.121
T=23°
The part in red is what the end-device has actually sent. Lines "^p1,16,10,0,5,5,-54", "^r500,5,12" and "^t2016-02-17T19:56:17.121" summarizes information for the received packet in a condensed manner that can be further exploited by the post-processing stage as it will be shown later on. Note that the packet type is expressed in decimal in the ^p string.
The gateway can actually be launched on another LoRa mode by using the --mode option in the command line:
5. Adding post-processing
Our approach is to transfer information between the low-level gateway program (basically running in a transparent manner) and the post-processing operations implemented by end-users in a high-level language. We provide a post_processing_gw.py Python script to demonstrate how advanced and complex post-processing tasks can be realized. Note how the gateway is launched now:
The first task for post-processing is for instance getting and exploiting information on the last received packet.
Getting information for the last received packet
As indicated previously, the low-level gateway outputs "^p1,16,10,0,5,5,-54" to indicate that the destination is 1 (the gateway), the packet type is 0x10 (DATA packet), source is 10, the sequence number if 0, the data length is 5, the SNR is 5 and the RSSI is -54. Our provided post-processing program looks for special, well-defined prefix sequences. The special sequence '^p' gives information on the last received packet. In the figure below, "^p1,16,10,0,5,5,-54" is issue by the low-level gateway program, but intercepted by post_processing_gw.py therefore it is not shown. Instead, post_processing_gw.py displays:
(dst=1 type=0x10 src=10 seq=0 len=5 SNR=5 RSSI=-54)
"^r500,5,12" means that the LoRa modulation uses bandwidth of 500kHz, coding rate of 4/5 and spreading factor of 12. "^t2016-02-17T19:56:17.121" indicated the received packet's timestamp in ISO format.
All lines that are not prefixed by some special sequence are displayed unchanged by post_processing_gw.py.
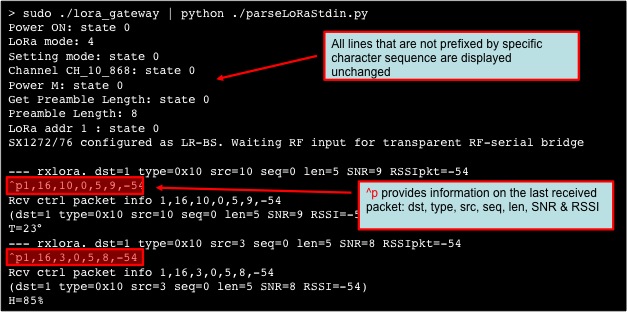
Figure: Getting information for last received packet
Prefix for data management
Special prefix sequences can be inserted by the end-devices to be intercepted and acted upon by post_processing_gw.py. We demonstrate the flexibility of this approach by intercepting and interpreting some prefixes: '^$', '\$', '\!'
We chose the following logic: '^' will indicate a prefix from the low-level gateway program and '\' indicates a prefix inserted by end-devices. Then we chose '$' for file logging service and '!' for pushing to a cloud. You can add your own.
Example: Logging to file
In the following figure, we show sensor 10 sending "\$T=23°" that indicates redirection to a log file. The prefix '\$' makes post_processing_gw.py to write in "telemetry.log" file. By default this file is in the Dropbox/LoRa-test folder that can then be shared under Dropbox. In order to have Dropbox support on the RPI, check this page. There is also an Dropbox-uploader solution but it has not been tested. With Dropbox, you can have access to these files accross the Internet and on all your Dropbox devices, and of course your smartphone.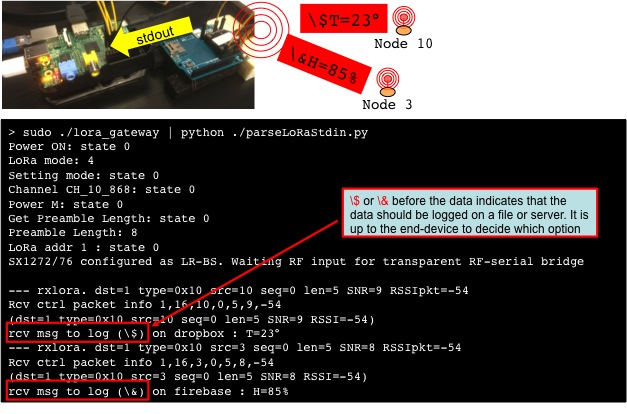
Figure: Using prefix from end-devices
post_processing_gw.py will display the following information:
rcv ctrl pkt info (^p): 1,16,10,0,5,5,-54
(dst=1 type=0x10 src=10 seq=0 len=5 SNR=5 RSSI=-54)
rcv msg to log (\$) in log file: T=23°
Here is a sample of the "telemetry.log" file when using '\$' prefix. Note that you can log any information because we currently only use string format when sending from an end-device.
(src=3 seq=0 len=5 SNR=8 RSSI=-54) 2015-11-04T22:43:04.091947> H=85%
(src=10 seq=1 len=62 SNR=9 RSSI=-54) 2015-11-18T13:34:48.351417> indicates that line should be logged in a file (telemetry.log)
(src=10 seq=2 len=5 SNR=9 RSSI=-54) 2015-11-18T13:34:51.354996> T=23°
(src=10 seq=3 len=62 SNR=9 RSSI=-54) 2015-11-18T13:35:17.809479> indicates that line should be logged in a file (telemetry.log)
The gateway program uses '^$' to identify important messages. For instance, information at gateway startup is prefixed by '^$' so that post-processing can handle these information accordingly. If you need to have additional information from the gateway to be prefixed by '^$' you have to modify the gateway program and recompile it.
Uploading to cloud platforms
The prefix '\!' makes post_processing_gw.py to upload the data
to cloud platform by calling all enabled cloud platforms. See
the README
file on cloud management.
Example with Firebase
In the following figure, we show how the '\!' prefix triggers a POST on a Firebase database. post_processing_gw.py uses the python-firebase package. Check this page for more information. The result comes from the '\!H=85%' message that indicates redirection to a Firebase database.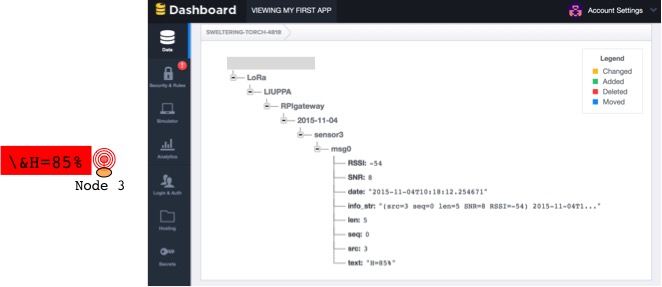
Figure: posting on Firebase
Note: you must have a Firebase account with a valid Firebase database identifier.
Example with ThingSpeak
In the following figure, we show how the '\!' prefix triggers a POST on a ThingSpeak channel.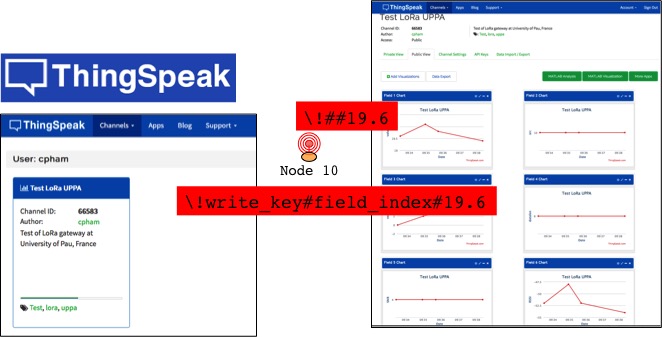
Figure: Posting on ThingSpeak
post_processing_gw.py will display the following information:
rcv ctrl pkt info (^p): 1,16,3,13,10,4,-60
(dst=1 type=0x10 src=3 seq=13 len=10 SNR=4 RSSI=-60)
rcv msg to log (\!) on ThingSpeak ( default , 1 ): 19.6
ThingSpeak: will issue curl cmd
curl -s -k -X POST --data field1=19.6&field5=13 https://api.thingspeak.com/update?key=AAAAAAAAAAAAAAAA
ThingSpeak: returned code from server is 1232
Note: you need to have a ThingSpeak channel with a valid write key. This write key will replace the part in red shown above. The end-device can actually send '\!write_key#field_index#20.1. write_key is your ThingSpeak channel write key. Then field_index is a number between 1 and 8 for the corresponding field in the channel. If you omit both the write_key and the field_index (sending '\!##20.1' for instance) then the default write_key will be used and the field index will be 1. For test purposes, we provide a test channel (default channel) whose write key is SGSH52UGPVAUYG3S. You can therefore test right away your gateway.
See our ThingSpeak channel for 2 temperature LoRa devices (sensor3 and sensor10) sending data every 10 minutes to the gateway. We will keep it running to test the gateway. See temperature from one of the sensor below.
Here are screenshoots from a smartphone:
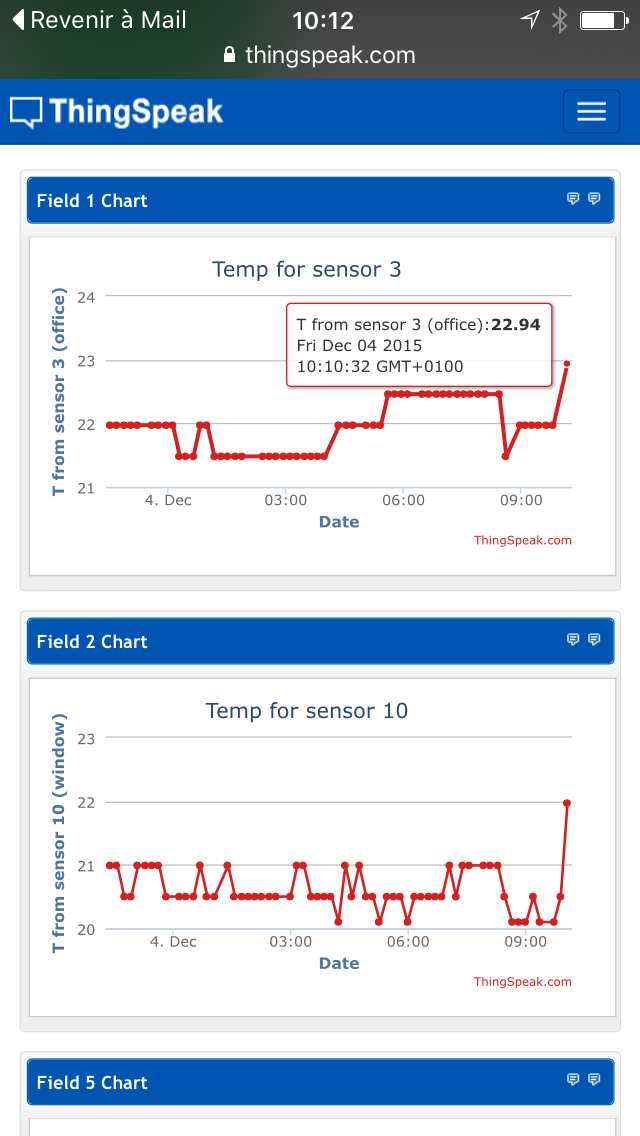
Figure: real time data displayed on ThingSpeak
Other cloud platforms
We also tested with other cloud platforms such as SensorCloud and GroveStreams. As most platforms provides REST API access it is quite easy to add new cloud platform. Again, see the README file on cloud management.
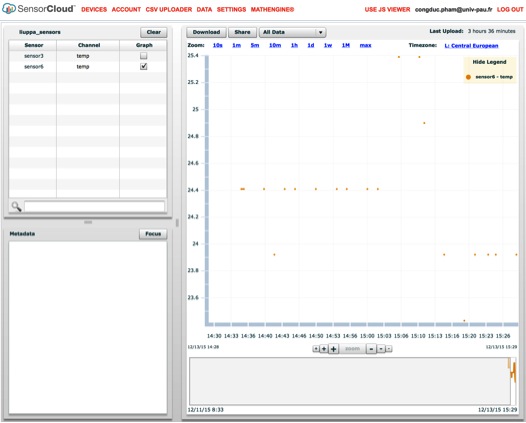
Figure: using SensorCloud
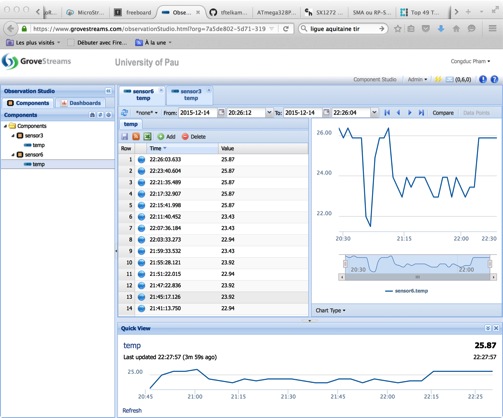
Figure: using GroveStreams
6. Logging all outputs, including post-processing, from the gateway
In order to log all outputs from the gateway, including those
from the post-processing stage, we just add another redirection
level. We provide a log_gw.py script that simply takes
everything from stdout, logs it in a file called
post-processing.log (in the Dropbox/LoRa-test folder) and writes
again to stdout for display. Example:
Here is a sample of such a file from our gateway that collects
temperature information from 2 LoRa temperature sensors for our
ThingSpeak
channel. The ThingSpeak channel write key has been
replaced with AAAAAAAAAAAAAAAA. Sensor 3 writes on field 1 and
sensor 10 on field 2.
2015-11-20T14:28:36.671743> LoRa mode: 4
2015-11-20T14:28:36.698168> Setting mode: state 0
2015-11-20T14:28:36.741636> Channel CH_10_868: state 0
2015-11-20T14:28:36.800036> Power M: state 0
2015-11-20T14:28:36.813887> Get Preamble Length: state 0
2015-11-20T14:28:36.828750> Preamble Length: 8
2015-11-20T14:28:36.846557> LoRa addr 1 : state 0
2015-11-20T14:28:36.858616> SX1272/76 configured as LR-BS. Waiting RF input for transparent RF-serial bridge
2015-11-20T14:30:21.144953> --- rxlora. dst=1 type=0x10 src=3 seq=0 len=11 SNR=4 RSSIpkt=-59
2015-11-20T14:30:21.153355> rcv ctrl pkt info (^p): 1,16,3,0,11,4,-59
2015-11-20T14:30:21.172314> splitted in: [1, 1, 3, 0, 11, 4, -59]
2015-11-20T14:30:21.189229> (dst=1 type=1 src=3 seq=0 len=11 SNR=4 RSSI=-59)
2015-11-20T14:30:22.206677> rcv msg to log (\!) on ThingSpeak ( default , 1 ): 22.94
2015-11-20T14:30:22.215569> will issue curl cmd
2015-11-20T14:30:22.255881> curl -s -k -X POST --data field1=22.94&field5=0 https://api.thingspeak.com/update?key=AAAAAAAAAAAAAAAA
2015-11-20T14:30:22.271261> returned code from server is 26
2015-11-20T14:30:22.298647>
2015-11-20T14:30:46.475160> --- rxlora. dst=1 type=0x10 src=10 seq=0 len=11 SNR=4 RSSIpkt=-66
2015-11-20T14:30:46.484312> rcv ctrl pkt info (^p): 1,16,10,0,11,4,-66
2015-11-20T14:30:46.501523> splitted in: [1, 16, 10, 0, 11, 4, -66]
2015-11-20T14:30:46.518002> (dst=1 type=0x10 src=10 seq=0 len=11 SNR=4 RSSI=-66)
2015-11-20T14:30:47.586317> rcv msg to log (\!) on ThingSpeak ( default , 2 ): 24.41
2015-11-20T14:30:47.599120> will issue curl cmd
2015-11-20T14:30:47.612896> curl -s -k -X POST --data field2=24.41&field6=0 https://api.thingspeak.com/update?key=AAAAAAAAAAAAAAAA
2015-11-20T14:30:47.631814> returned code from server is 27
2015-11-20T14:30:47.657144>
2015-11-20T14:41:10.114686> --- rxlora. dst=1 type=0x10 src=3 seq=1 len=11 SNR=5 RSSIpkt=-57
2015-11-20T14:41:10.123342> rcv ctrl pkt info (^p): 1,16,3,1,11,5,-57
2015-11-20T14:41:10.139994> splitted in: [1, 16, 3, 1, 11, 5, -57]
2015-11-20T14:41:10.157897> (dst=1 type=0x10 src=3 seq=1 len=11 SNR=5 RSSI=-57)
2015-11-20T14:41:11.156688> rcv msg to log (\!) on ThingSpeak ( default , 1 ): 22.46
2015-11-20T14:41:11.165119> will issue curl cmd
2015-11-20T14:41:11.181350> curl -s -k -X POST --data field1=22.46&field5=1 https://api.thingspeak.com/update?key=AAAAAAAAAAAAAAAA
2015-11-20T14:41:11.228312> returned code from server is 28
2015-11-20T14:41:11.237319>
2015-11-20T14:41:36.516028> --- rxlora. dst=1 type=0x10 src=10 seq=1 len=11 SNR=4 RSSIpkt=-68
2015-11-20T14:41:36.525644> rcv ctrl pkt info (^p): 1,16,10,1,11,4,-68
2015-11-20T14:41:36.541918> splitted in: [1, 16, 10, 1, 11, 4, -68]
2015-11-20T14:41:36.563111> (dst=1 type=0x10 src=10 seq=1 len=11 SNR=4 RSSI=-68)
2015-11-20T14:41:37.544064> rcv msg to log (\!) on ThingSpeak ( default , 2 ): 21.48
2015-11-20T14:41:37.552806> will issue curl cmd
2015-11-20T14:41:37.598217> curl -s -k -X POST --data field2=21.48&field6=1 https://api.thingspeak.com/update?key=AAAAAAAAAAAAAAAA
2015-11-20T14:41:37.605706> returned code from server is 29
2015-11-20T14:41:37.617876>
7. Tools for testing & build a LoRa gateway for on-the-go tests
We describe here some hints when doing range tests
or add & test new functionalities into the post-processing
stage.
First, the gateway LoRa parameters can be configured remotely with
ASCII control sequences. We use prefix '/@' to indicate a remote
control packet. The command should be terminated with an '#'.
Available commands are:
/@M1#: set LoRa mode 1
/@C12#: use channel 12 (868MHz)
/@PL/H/M/x/X#: set power to Low, High, Max, extreme (PA_BOOST),
eXtreme (+20dBm) if available
/@A9#: set node addr to 9
Before the gateway accepts to be configured remotely, the
'/@Upin_number#' command must be issued. For instance, if the
pin number is 1234 then to unlock the gateway, command
'/@U1234#' should be sent to the gateway. To lock again, just
issue the same command. There is a limited number of trials
before the gateway is completely blocked for remote
configuration. You can change all these settings by simply
recompiling the gateway program.
Use an Arduino-based gateway
As mentioned previously, the lora_gateway code can be compiled and uploaded to an Arduino board (MEGA/Due or TeensyLC/31/32 to have enough RAM memory). If you connect the Arduino gateway to your laptop all outputs will be sent through the serial port.
You can use any serial tool to get data from the Arduino
gateway. We use the very convenient serial monitor of the
Arduino IDE that allows us to easily send command to the Arduino
gateway through the serial port for configuring various LoRa
parameters as described previously (when these commands come
from serial line, the gateway does not ask for the unlock pin):
/@M1#: set LoRa mode 1
/@C12#: use channel 12 (868MHz)
/@PL/H/M#: set power to Low, High or Max
/@A9#: set node addr to 9
With the gateway connected to the laptop and output displayed
by a serial tool, you will see all received frame as in the RPI
gateway standalone mode described previously.
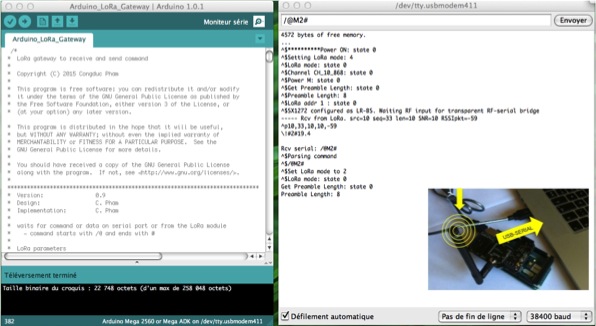
Figure: screenshot of the Arduino IDE with the Arduino gateway
outputs
If you connect the Arduino gateway and use a python script to
forward data from serial port to stdout (see for instance our
SerialToStdout python script available in 38400
or 115200
baud versions from our test-bed
page) you can have an Arduino-based gateway with full
post-processing features (executed on your laptop) provided that
your laptop has Internet connectivity. For field tests, I use my
smartsphone 3G/4G connection to get Internet access on the
laptop. In this way you can have a LoRa gateway on-the-go for
your tests.

Figure: Arduino gateway with full post-processing features
Use the Raspberry gateway
You can use the DIY Raspberry gateway connected to your laptop as well. In this case, the laptop is use to provide the power and you would simply launch the Raspberry gateway by opening an ssh session. You can just use a cross-over Ethernet cable to connect the Raspberry gateway to you laptop which is supposed to have Internet connectivity for full post-processing features. If your laptop has Dropbox, your Raspberry can have it as well as indicated earlier. For field tests, I use my smartsphone 3G/4G connection to get Internet access on the laptop, then share this connection with the Raspberry.
End-device for sending LoRa messages
We also developped a simple end-device that will allow you with the Arduino IDE to enter ASCII string for transmission to the gateway (by default, the destination address is 1). It waits continuously for input from serial port, then send the message. With this end-device you can dynamically send prefixed messages to test the various post-processing tasks. You can perform range tests when you request an ACK from the gateway. You can send remote control commands to the gateway (by providing the unlock pin) to change its LoRa parameters (be sure to be able to communicate with it again).
In addition, the end-devices accepts the following command for its configuration. We use prefix '/@' to indicate a command packet. The command should be terminated with an '#'. Available commands are:
/@M1#: set LoRa mode 1
/@C12#: use channel 12 as defined in the SX1272.h file (868MHz
band)
/@PL/H/M/x/X#: set power to Low, High, Max, extreme (PA_BOOST),
eXtreme (+20dBm)
/@A9#: set node addr to 9
/@ACK#hello w/ack : sends "hello w/ack" and request an ACK
/@ACKON#: enables ACK (for all messages)
/@ACKOFF#: disables ACK
/@CAD#: performs an SIFS CAD, i.e. 3 or 6 CAD depending on the
LoRa mode
/@CADON3#: uses 3 CAD when sending data (normally SIFS is 3 or 6
CAD, DIFS=3SIFS)
/@CADOFF#: disables CAD (IFS) when sending data
/@RSSI#: toggles checking of RSSI before transmission and after
CAD
/@EIFS#: toggles for extended IFS wait
/@T5000#: send a message at regular time interval of 5000ms. Use
/@T0# to disable periodic sending
/@TR5000#: send a message at random time interval between [2000,
5000]ms.
/@Z200#: sets the packet payload size to 200 for periodic
sending
/@S50#: sends a 50B user payload packet filled with '#'. The
real size is 55B with the Libelium header
/@D56#: set the destination node to be 56, this is permanent,
until the next D command
/@D58#hello: send "hello" to node 56, destination addr is only
for this message
/@D1#/@M1#: send the command string "/@M1#" to node 1 (i.e.
gateway), this would make the gateway to switch to mode 1
For instance, if you want to test the ThingSpeak features with
the provided test channel, you can use the end-device to send
"\!SGSH52UGPVAUYG3S#1#21.6". If you want to request an ACK from
the gateway, you can use "/@ACK#\!SGSH52UGPVAUYG3S#1#21.6".
You can use this interactive end-device to perform range tests
with various LoRa modes. For instance you can request an ACK in
order to verify that the gateway is correctly receiving your
message:
If the message has been correctly received, you can test again with an other LoRa mode to see if connectivity is still maintained:
/@M2#
/@ACK#hello w/ack
The first command asks the gateway to switch to LoRa mode 2 and
request an ACK to be sure that the command has been correctly
received. Then the end-device switchs itself to LoRa mode 2 and
finally sends the message by requesting an ACK. Don't forget to
unlock the gateway in order to be able to remotely configure the
gateway. To do this, issue command /@ACK#/@U1234# prior to the
/@ACK#/@M2# message.
When requesting an ack from the gateway, the end-device will
receive both the SNR of the packet received at the gateway
(carried by the ACK) and the SNR of the received ACK. In this
way, you can know the quality of the link. The first SNR is 7dB
and it is the SNR of the packet received at the gateway, sent by
by the gateway in the ACK packet. Then the second SNR (6dB) is
the SNR of the received ACK at the end-device.
^$Parsing command
^$/@ACK#hello
Sending. Length is 5
hello
Payload size is 5
ToA is w/5B Libelium header 281
Packet number 0
wait for ACK
Starting 'getACK'
## ACK received:
Destination: 6
Source: 1
ACK number: 0
ACK length: 2
ACK payload: 0
ACK SNR of rcv pkt at gw: 7
##
--- rxlora ACK. SNR=6 RSSIpkt=-16
LoRa (ACK) Sent in 1586
LoRa Sent w/CAD in 1586
Packet sent, state 0
Locally test&debug post-processing stage
You can write a test text file (test.txt) containing lines
similar to :
^p1,16,10,0,5,9,-54
T=23°
^p1,16,3,0,5,8,-54
H=85%
^p1,16,10,1,7,9,-54
\$T=23°
^p1,16,10,0,4,9,-54
\!SGSH52UGPVAUYG3S#2#13.5
^p1,16,3,0,4,9,-54
\!##27.5
^p1,16,10,2,5,9,-54
hello
^p1,16,3,2,5,9,-54
world
and then issue the following command:
8. Using Application key to filter out messages
At the end-device level an additional application key can be used
as prefix to all messages sent by the device. We chose the
solution to let the end-device, thus the application owner, to
insert before the real application payload the application key
(but from the library perspective, it belongs to the payload data.
The gateway's behavior therefore remains unchanged and the
application key will be passed as regular data to the
post-processing stage. You can see the LoRa temperature example
provided in download to see how application key is implemented.
The current application key is coded on 4 bytes.
post_processing_gw.py will then check whether the packet type is
0x12 (that indicates a DATA packet and the with_appkey flag)
to read the application key and find whether the key is a
registered application key or not (the list of valid application
key is defined in post_processing_gw.py and should match with the
application key defined at end-devices). Here is the post-processing output with application key enabled:
2015-11-30T13:02:39.291314> rcv ctrl pkt info (^p): 1,18,6,136,17,9,-56
2015-11-30T13:02:39.295361> splitted in: [1, 18, 6, 136, 17, 9, -56]
2015-11-30T13:02:39.299561> (dst=1 type=0x12 src=6 seq=136 len=17 SNR=9 RSSI=-56)
2015-11-30T13:02:39.304258> got first framing byte
2015-11-30T13:02:39.312637> --> got app key sequence
2015-11-30T13:02:39.316382> app key is: [5, 6, 7, 8]
2015-11-30T13:02:39.320188> in app key list
2015-11-30T13:02:39.333956> valid app key: accept data
2015-11-30T13:02:39.857162> rcv msg to log (\!) on ThingSpeak ( default , 3 ): 20.99
2015-11-30T13:02:39.861032> ThingSpeak: will issue curl cmd
2015-11-30T13:02:39.864619> curl -s -k -X POST --data field3=20.99&field7=136 https://api.thingspeak.com/update?key=AAAAAAAAAAAAAAAA
2015-11-30T13:02:39.868063> ThingSpeak: returned code from server is 2490
Without application key enforcement, post_processing_gw.py will process all LoRa data prefixed by correct logging prefix (i.e '\$', '\!'). With application key, all LoRa data will need a valid application key otherwise the data will be discarded as shown below:
2015-11-30T13:02:39.291314> rcv ctrl pkt info (^p): 1, 18, 6,136,17,9,-56
2015-11-30T13:02:39.295361> splitted in: [1, 18, 6, 136, 17, 9, -56]
2015-11-30T13:02:39.299561> (dst=1 type=0x12 src=6 seq=136 len=17 SNR=9 RSSI=-56)
2015-11-30T13:02:39.304258> got first framing byte
2015-11-30T13:02:39.312637> --> got app key sequence
2015-11-30T13:02:39.316382> app key is: [9, 10, 11, 12]
2015-11-30T13:02:39.320188> not in app key list
2015-11-30T13:02:39.333956> invalid app key: discard data
10. Additional links
Other works that we are doing
- Our image sensor with a LoRa radio for getting images from remote places for situation-awareness or surveillance applications
- C. Pham, "Low-cost,
Low-Power and Long-range Image Sensor for Visual
Surveillance". Proceedings of the 2nd Workshop on
Experiences with Design and Implementation of Smart Objects
(SMARTOBJECTS'16). Co-located with ACM MobiCom'2016,
New-York, USA, October 3-7, 2016.
- Our papers on low-cost LoRa framework and activity time sharing for handling emergency situation and providing QoS guarantees with LoRa
- C. Pham, "QoS for Long-Range Wireless Sensors under Duty-Cycle Regulations with Shared Activity Time Usage". ACM Transactions on Sensor Networks (TOSN), Volume 12 Issue 4, September 2016.
- C. Pham, A. Rahim, P. Cousin, "Low-cost, Long-range Open IoT for Smarter Rural African Villages". Proceedings of the IEEE International Smart Cities Conference (ISC2), Trento, Italy, Sep. 12-15, 2016.
- C. Pham, "Building
low-cost gateways and devices for open LoRa IoT test-beds".
Proceedings of the 11th EAI International Conference on
Testbeds and Research Infrastructures for the Development of
Networks & Communities (TridentCom'2016) , Hangzhou,
China, June 13-15, 2016.
- C. Pham, "Deploying a Pool of Long-Range Wireless Image Sensor with Shared Activity Time". Proceedings of the 11th IEEE International Conference on Wireless and Mobile Computing, Networking and Communications (WiMob'2015), October 19-21, 2015, Abu Dhabi, UAE.
Other DIY LoRa gateway initiatives
- A recent LoRaWAN gateway with PiSupply IoT LoRa Gateway HAT for Raspberry Pi
https://blog.hackster.io/hands-on-with-the-pisupply-lora-gateway-40e9d4cb11fc - An early LoRaWAN gateway based on Raspberry and Multitech mCard
from Nestor Ayuso
https://github.com/mirakonta/lora_gateway/wiki/Part-1:-Choose-the-hardware - A LoRaWAN gateway based on Raspberry and IMST IC880a board
https://github.com/ttn-zh/ic880a-gateway/wiki
- A LoRaWAN gateway based on Raspberry and a LinkLab LoRaWAN
shield
http://www.instructables.com/id/LoRaWAN-Gateway/?ALLSTEPS
- A proof-of-concept single channel LoRa gateway with
SX1272/1276
https://github.com/tftelkamp/single_chan_pkt_fwd
- An early Raspberry LoRa gateway developped by Dave Akerman
for High Altitude Ballooning
http://www.daveakerman.com/?p=1719
LoRa and python
- A python library to drive a LoRa radio module: Raspberry and
inAir9
This can be used to make the script running on the gateway able to send information back to end-devices
https://github.com/mayeranalytics/pySX127x - A kickstarter project for multi-radio node and gateway: LoPy
https://www.kickstarter.com/projects/1795343078/lopy-the-lora-wifi-and-bluetooth-iot-development-p?ref=discovery
Other community based IoT LoRa initiatives
LoRa radios
11. Some words about LoRaWAN (gateway and end-device)
The gateway is not LoRaWAN
compatible. It is not it's purpose. A real LoRaWAN gateway
should be multi-channel to strictly follow the specification.
However, we believe LoRaWAN is not necessary for everybody and
might even be not adapted for small to medium scale deployment,
where tight control on the deployed infrastructure is
preferable.
However, some LoRaWAN features can be added if one wants to do
so. If you want a quick explaination of LoRaWAN, there is this nice
and simple tutorial (and also how to set a LoRaWAN network
server) and this
one from LinkLabs. Actually, there are some DIY
"single-channel" gateways that do have some LoRaWAN features
such as:
- the aforementioned single channel LoRa gateway by Thomas Telkamp: https://github.com/tftelkamp/single_chan_pkt_fwd. A nice discussion on this topic is available on TheThinkNetwork forum: http://forum.thethingsnetwork.org/t/single-channel-gateway/798
Our gateway can be configured to work on one of the LoRaWAN
channel (i.e. 868.1MHz with BW=125kHz, CR=4/5 and SF=7) by using
so-called mode 11:
You can find more information on how our low-cost devices and gateways support limited features of LoRaWAN on our GitHub README-aes_lorawan.md.
You can also launch the gateway with complete settings as follows (identical to the so-called mode 11):
Then you can build LoRaWAN end-devices by either using one of the LoRaWAN implementations that exists (LMIC and LoRaMAC-Node) with a simple LoRa module plugged in a board. Again, Thomas Telkamp has a great port of LMIC for Arduino. Or you can use a radio module that already has an implementation of LoRaWAN. In most cases, you will be able to issue commands to the radio module for realizing LoRaWAN operations. Check this page from TheThingNetwork for a nice summary of LoRa/LoRaWAN hardware: http://thethingsnetwork.org/wiki/Hardware/OverviewNodes.
I also want to mention a very light implementation of LoRaWAN that was originally intented for the Ideetron Nexus board (ATmega328P and RFM95W) but that compile straight away on most of Arduino boards with the RFM95W module connected accordingly (it uses DIO0 for RxDone, DIO1 for Timeout and DIO5 for Ready). It is worth looking at it if you want to start understanding a bit the basic of LoRaWAN: https://github.com/Ideetron/RFM95W_Nexus by Gerben den Hartog. The AES implementation is quite lightweight and I've tested the code on both an Arduino MEGA2560 and an Arduino Pro Mini. Of course, only a minimum support of LoRaWAN is provided but it is a nice starting point. Matthijs Kooijman merged the LMIC port of Thomas Telkamp with the lightweight AES library of Gerben den Hartog to propose and LMIC lightweight LMIC port. Maarten Westenberg also contributed in some way for a more lighweight LoRaWAN stack with support of the ESP8266. Here are pictures of some of our LoRaWAN tests using HopeRF RFM95W.
Using the single channel packet forwarder by Thomas Telkamp and the LMIC port by Matthijs Kooijman Dragino has that nice wiki page for their LoRa/GPS Hat shield to build both end-devices and gateway that have small LoRaWAN support (of course you can alway use a simple radio module and just connect the required SPI and DIO pins). We actually have a test single channel packet forwarder (running at 865.2MHz and BW125SF12, so equivalent to the so-called LoRa mode 1) that is registered on TheThingNetwork. Status messages have been tested but it is most of the time not running right now. I also want to mention this great and nice project for a simple open-source private LoRaWAN network server by Orne Brocaar.
Enjoy!
C. Pham
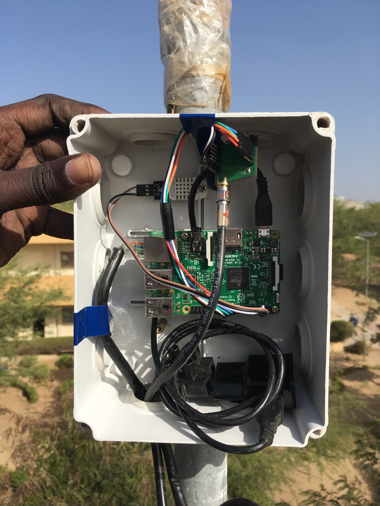
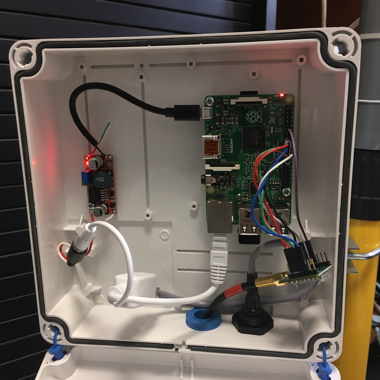
Some deployments
Specific developments can be made from the general, public
version on github. If you are interested by such customization,
you can contact me.